


While Intuit still supports the Desktop version of QuickBooks, they are actively encouraging users to make the switch to their cloud-based online accounting software called QuickBooks Online (QBO). Indeed, QBO offers many selling features for its users, the most notable of which is the ability to access accounting data in real-time from any device. This allows business owners to automate workflows and make more informed decisions to drive growth.
At the same time, the software isn’t without its limitations. And Intuit knows it. That’s why they are continually rolling out QBO upgrades to better meet the changing demands of today’s business landscape. Many of these features have been long awaited by business owners who wish to further streamline their small business accounting needs without the hassle of installing third-party applications.
Removing these barriers should help to get more users to move to the cloud using QBO.
In this post, we will highlight three recent upgrades to QBO and how you can use them to meet your small business accounting needs when it comes to managing payables, inventory and projects.
QUICKBOOKS BILL PAY
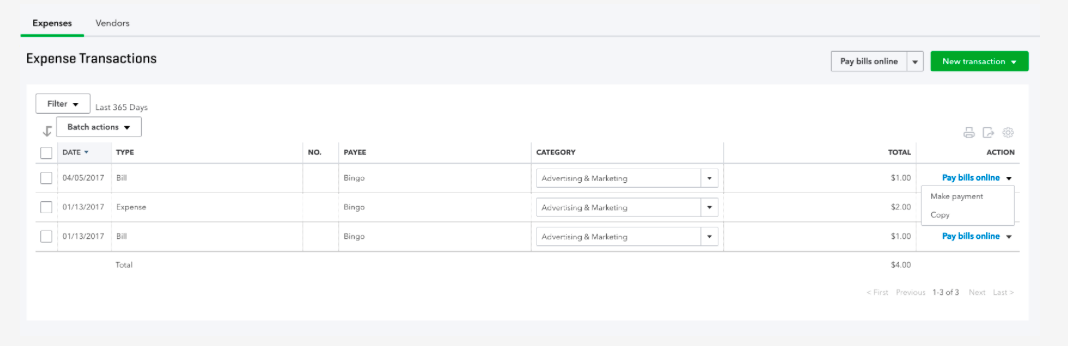
QuickBooks has finally built its own electronic bill payment service known as QuickBooks Bill Pay. This particular upgrade stands to benefit all businesses but especially those with a large number of payables to manage.
And while there is no additional set up needed for QuickBooks users apart from creating a Bill Pay Customer ID and PIN, it does come with a monthly fee of $15.95 per month for up to 20 payments and $6.95 for each additional set of 10 payments. If you’re on the fence about this one, QuickBooks offers a 30-day free trial so you can determine whether it’s the right solution for your business.
Key features
- Security. Online payments are sent through a secure Internet connection and SSL encryption technology plus the use of a PIN is required for all transactions.
- Streamlined Routines. Accounts payable processes can be automated with the scheduling of automatic or recurring payments.
- Convenient Access. Bills are accessible from anywhere an internet connection is available. This means you can pay bills in real-time even if you are out of town at a business conference.
- Cost Savings. With QuickBooks Bill Pay, you will no longer need to rely on snail mail to send paper check payments or incur hefty fees to wire funds. You can pay your invoices a lot sooner and take advantage of vendor early payment discounts.
- Financial Management. Overall, this tool helps you to reduce manual error and provides you with more control over your cash flow.
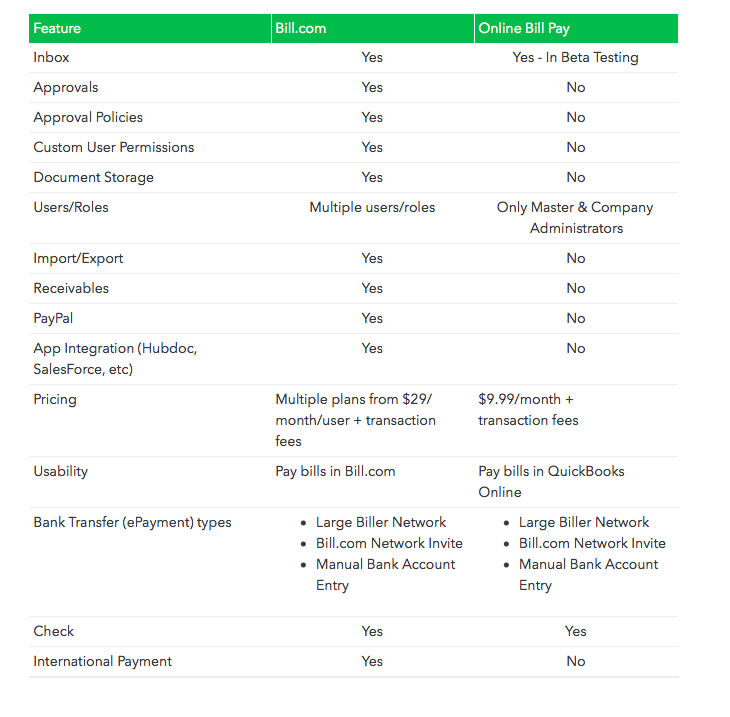
While the system mirrors Bill.com in some ways, there are several differences between the two. Your selection ultimately depends on your specific needs when it comes to handling payables.
NOTE: If you are currently using Bill.com and would like to switch to Bill Pay, then you must cancel your Bill.com subscription.
Here’s a snapshot of the key differences between QuickBooks Online Bill Pay and Bill.com.
RELATED: Small business accounting apps that integrate with QuickBooks
Getting Started Tips
In order to use the bill pay option, you must enable your account for online payments which takes just a few minutes. Once enrolled, you can then send / receive payments to and from vendors, customers and employees (except payroll checks).
Enabling QuickBooks Account for Online Payment
- From the Banking menu, select Bank Feeds > Set-Up Bank Feed for an Account. You will see this pop-up message: “All open QuickBooks windows will be closed temporarily to set up online banking services. Followed by: “Do you want to Continue?” Click Yes.
- Choose your QuickBooks account > click Next.
- Select QuickBooks Bill Pay.
- Enter your QuickBooks Bill Pay Customer ID and PIN. Confirm your PIN, then sign in.
- Intuit will be able to provide you with your QuickBooks Pay Customer ID and PIN information at the time of set up.
- Only the bank account owner can sign up for bill pay as well as go through the verification process.
- Select Finish to close the set up wizard and view the Online Banking Center in QuickBooks.
Sending Payments
Once you’ve set up your new QuickBooks Bill Pay account, you can start sending electronic payments to anyone in the United States who has a valid address and phone number. Be sure to review all customer and vendor information when making initial payments to ensure accuracy.
All payments will be sent electronically using the Automated Clearing House (ACH) or MasterCard RPS network on the date you specified. If they payee cannot receive electronic payments, a paper check will be mailed instead. Funds are usually received the next business day and you will be able to check for the itemized transaction on your monthly bank statement.
NOTE: It may take some time for an item to show as cleared in QuickBooks because the recipient has to process payment on their end first.
QUICKBOOKS PARTIAL PURCHASE ORDERS TOOL
QuickBooks now boasts the option of partial purchase orders (POs) as Intuit places more focus on features that can support inventory management. Prior to this update, there was no simple way to account for receiving partial purchase orders in QBO. You had to manually re-enter items and quantities, which is not only a time-consuming process but also one that is prone to many errors.
Before
When items from a purchase order are received, they are compared against the original PO in QuickBooks to check for items that might be delayed in shipping. If you receive your complete order the first time around, then there’s no hassle. But what happens if you placed a large order for 30 widgets of various styles which are on backorder?
There’s a very good chance that not all the widgets will arrive at the same time. At this point, you could choose to duplicate the PO and delete the lines that are not being received so you can generate a bill. Or you can edit the quantity on the original PO. However, there would still be items that are unaccounted for that you would need to keep track of manually.
After
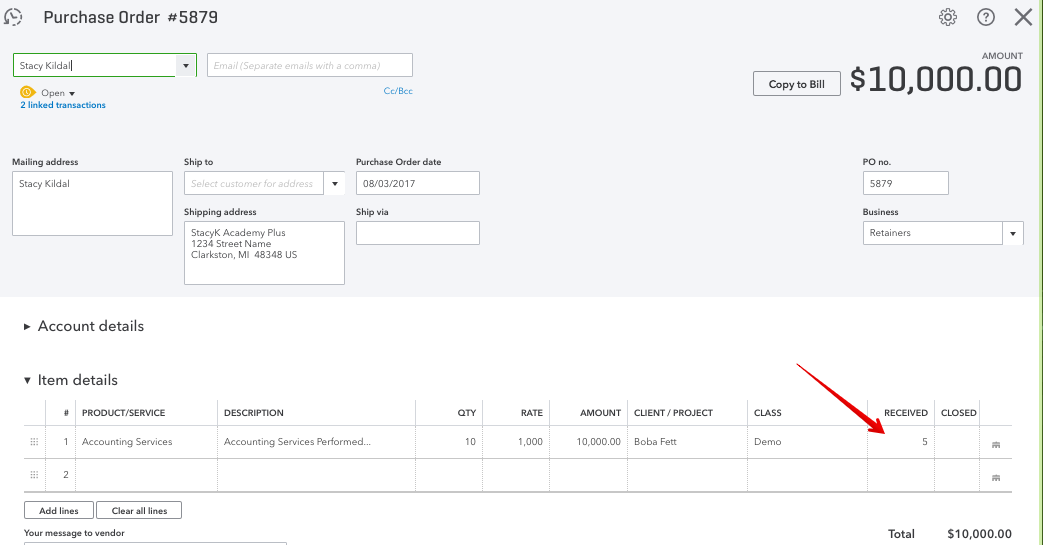
With the new partial purchase order system, this process is much easier. Now, each time you enter a purchase transaction and choose the appropriate purchase order from the drawer from which you add items, the original purchase order is updated in the quantity received column as shown in the image below. Also, partial purchase orders can be received in the Vendor Bills menu as well.
There’s no additional setup required to use the Partial Purchase Order tool. However, you must be a QuickBooks Online Plus subscriber to benefit from this upgrade.
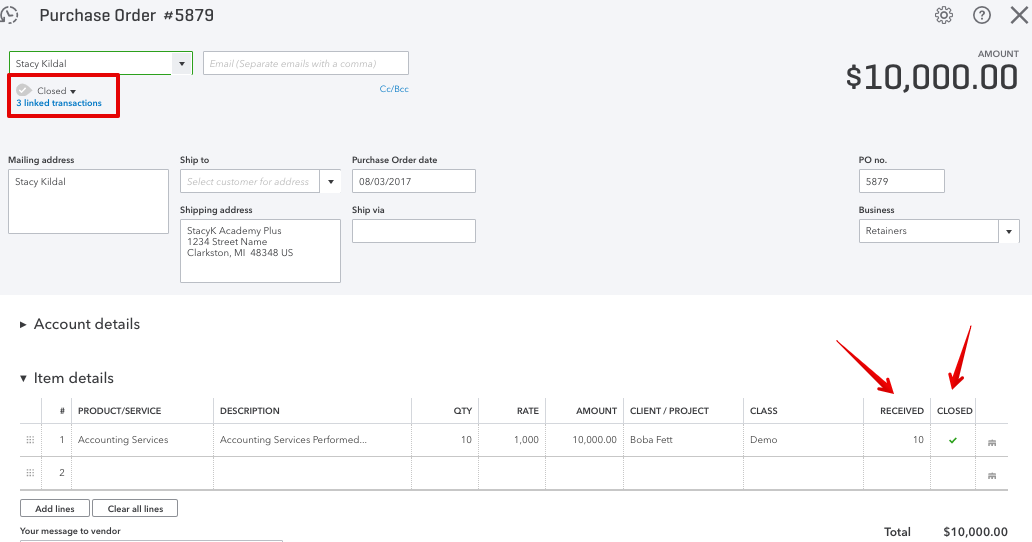
NOTE: Each time a PO is received, the drawer is updated to show the original balance as well as the new balance based on the items received. An expense transaction link will also be created for each related partial purchase order. QuickBooks automatically closes a purchase order when all quantities and/or amounts on the purchase order are accounted for across all linked transactions.
Alternatively, you can manually close the purchase order by changing the status on the PO, or by closing individual lines on the purchase order.
QBO PROJECT TRACKING
Project tracking in QBO was another major pain point for construction companies and other project-based industries. It was difficult to track job revenue, expenses and the percentage of work completed through the cloud-based platform.
However, in order to address this limitation, Intuit has introduced a new feature called QuickBooks Online Projects, which is a project management tool for small businesses. While this upgrade doesn’t have all the robust features that add-on applications such as Bill Quick offer, it’s a step in the right direction for users who don’t wish to integrate yet another third-party application.
In order to enable project tracking:
- Click the gear icon in the upper right corner > Account and Settings.
- Select Advanced settings and scroll down.
- Select Projects.
- Click Save.
NOTE: Once you turn on the project tracking feature, it can’t be disabled.
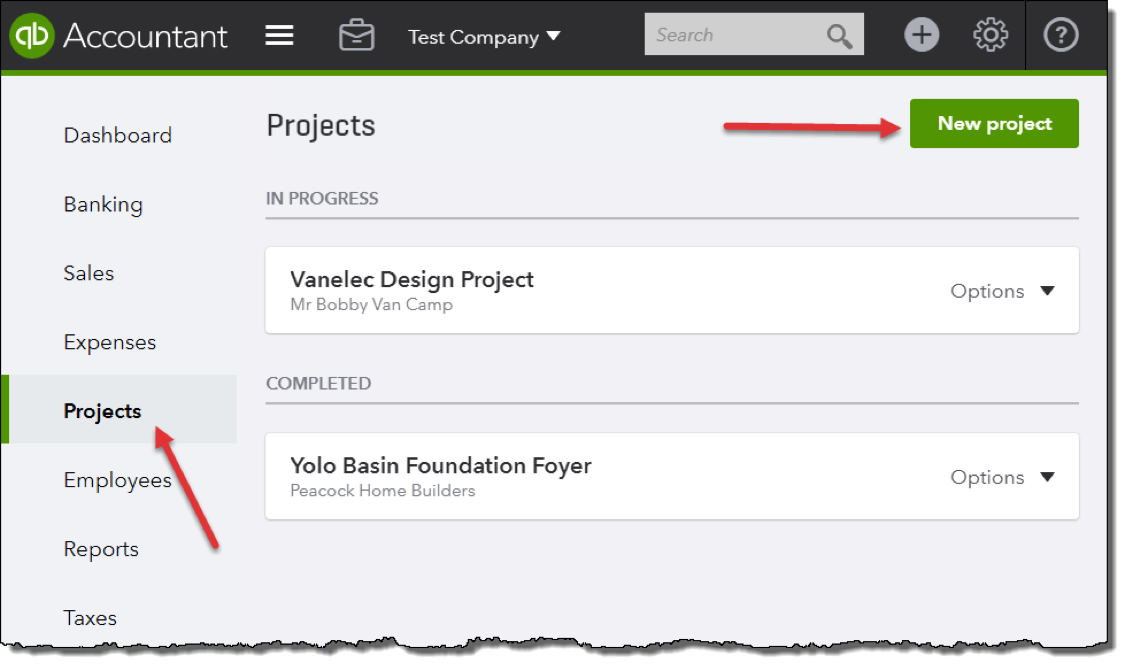
Project statuses can be tracked within this tool and marked as either in progress, completed or canceled. When setting up new projects, always be sure to include the project name as well as the assigned customer.
Once you have created a new project, it will appear on your “Project List”. From the project list, you will be able to edit the project, view project-oriented reports, view a list of project-related transactions and of course, add new transactions.
QBO offers an excellent starting point for smaller businesses to track projects though we wouldn’t recommend it for larger scale operations.
Key Features
- Projects are supported in various categories including invoices, expenses, estimates, time transactions, bills and purchase orders. To create these categories, you can either select the “Add to Project” button as shown below (when viewing the project within QBO). Alternatively, you can select the project directly from within a new transaction via the “Create” menu.
- The project overview tab allows users to run several project-oriented reports. Note that these reports cannot be accessed in the “Report Center” but only when you are in the “Projects” window.
- You can still post transactions to projects that are cancelled or completed though we don’t recommend posting to closed projects.
The takeaway here is that the software allows you to see all your projects and sub-customers in one convenient place. This is streamlining at its finest.
Speaking of sub-customers, if you are currently using sub-customers, you can merge these transactions into the project view by changing the name of the sub-customer to be the same as the project. Simply follow these easy steps:
- Set up the project under the same parent customer as the sub-customer. However, the project must have a different name than the sub-Customer.
- Go back to Customers and select the sub-customer.
- Update the name of the sub-customer to the project name and say Yes to merge.
- All the transactions for that sub-customer will now be housed in the project directly.
SUMMARY
Automating your small business accounting needs using these QuickBooks upgrades offers a stepping stone to getting a better handle on your business finances. However, you may still need more help with the books to ensure that all your financial records are kept up-to-date each week. Remember, having accurate real-time data will allow you to make the most informed decisions for business growth.
Instead of managing the books on your own or hiring an expensive in-house bookkeeper, consider the services of an outsourced accounting firm like Ignite Spot. Get a complete bookkeeping solution including: bank reconciliations, customer invoicing and collections, bill payment, credit card management and more, at a fraction of the cost.
We can provide guidance for your business allowing you to focus on growing your business instead of worrying about recording journal entries, ledgers and invoices.
As mentioned above, bank reconciliation is one of our core services offered to customers who use online bookkeeping to manage their company accounts. Some of our bank reconciliation services include daily, weekly, or monthly data entry from your bank account to your accounting software. In addition, we can also assist you with cash reporting on an as needed basis.
We are here to get you started on the journey to fully automating your finances in the cloud. If you’re a small business owner looking for fast, affordable and convenient ways to streamline your operations, improve cash flow management and scale your business, then reach out to our team today.


.svg "Rewind Logo-vector-dark (2)")

