


 If you are a small business owner, then you know there’s a lot to keep track of. And sometimes it can be hard to know where to begin. That’s where a Chart of Accounts comes in.
A Chart of Accounts (COA) is a complete listing of every account in a business’s accounting system. Accounts come in various types to reflect money spent or earned in addition to assets owned or amounts owed to a creditor. The Chart of Accounts is an excellent a way to record all of these transactions for income, expenses, or liabilities.
If you earn money it will be recorded in an income account. If you buy business supplies, that transaction will be recorded in an expense account. There’s even an account for liabilities such as mortgages or loans.
The Chart of Accounts is one of the first things you will need to create after you set up a company file in your online bookkeeping system. Having a Chart of Accounts gives you a place to record the payments you receive. Without it, sending invoices and receiving payment can get messy. Completing these steps is imperative especially around tax time, when running a profit and loss report, or analyzing transactions.
In a dream world, your Chart of Accounts would only contain assets and income accounts. However, in reality, liability and expense accounts are going to be present also. And this isn’t necessarily a bad thing. In fact, every business incurs expenses and liabilities in order to acquire assets and generate income. For many businesses, incurring expenses and investing for the future is critical to long term planning,
All of your accounts will work together to balance each other out once you know how each account affects your business transactions and financial reports.
ACCOUNT TYPES
Assets
Assets in your Chart of Accounts refer to items that you own that contain some type of value such as equipment, buildings, inventory or vehicles. This list may also include other accounts such as accounts receivable and notes receivable. Assets should appear on your balance sheet in order of liquidity (i.e. the time it would take to convert those assets to cash).
The first line item will usually be cash or cash equivalents, followed by your accounts receivable. Collecting on receivables from customers is highly important to your list of assets. Inventory and fixed assets do have liquidity; however, it could take much longer to convert them to cash compared to collecting payments from customers.
It’s important to note that holding more assets on your balance sheet doesn’t always translate to business growth. For example, if your accounts receivable line item continues to grow quarter after quarter, but you’re having difficulty collecting payments during your accounting cycle, then you could run into a cash crisis.
RELATED: How Online Bookkeeping Boosts Customer Payments
Liabilities
Liabilities are what you owe. They require you to give up cash, assets, etc. to settle past transactions. Some business liabilities include bank loans, personal loans, income tax payments due, payroll taxes and accounts payable. On the balance sheet, liabilities can be found opposite the assets section. Liabilities will be listed in order of payment terms, from shortest to longest.
Current liabilities will always be listed first. These are items you will be expected to settle within one year. On the other hand, as the name suggests, long-term liabilities are all liabilities that are not due in full within a year. These would include deferred taxes, pension payments, or loans.
Income
Your Chart of Accounts will include an income account to track money your business has generated over a particular period of time. This account is pretty simple to understand. At the same time, it happens to be the most underused account as well.
Whether you manufacture and sell items such as blender bottles or provide services such as consulting, you should establish an income account to track all income-generating aspects of your operations. Setting up multiple income accounts in your system will come in handy when tracking cost of goods and profit levels for each category.
Expenses
Expenses are an essential part of every business. As the saying goes, “you have to spend money to make money.” You just don’t want to spend more that you can earn. Your operating expenses include rent, wages, advertising and the like that you need to incur to run your business. Non-operating expenses are costs that can’t be traced back to a particular revenue line item such as interest expense. Using an online bookkeeping system that is designed to record these line items can be very valuable because it allows you to easily highlight areas where you can improve expense management to boost profitability.
As with income, you should also keep separate expense accounts that are simple to understand. Be careful to create subcategories only when necessary. For example, if your company is an online business that ships a lot of merchandise to customers you might want to track shipping costs. This is an important one especially if you run free shipping specials if customers spend a certain dollar amount. By tracking your expenses in this why you can start to see whether particular expenses are necessary or not. For instance, offering free shipping may help you to generate more sales, but not necessarily more profit.
As your business grows you will need a fast, accurate and complete reporting system. And your Chart of Accounts functions like a map of past and present transactions. Keep it clean and organized so it can make sense to you, specifically if you plan on doing your accounting yourself. It prevents confusion that you don’t want at all.
GETTING STARTED

Photo: Pixabay
Many accounting systems come with a preset Chart of Accounts that include number headings like 101.34 or 730.26. Although these account numbers can be helpful, they aren’t absolutely necessary, especially if you’re a small business. Over time, they can become confusing, complicated and cumbersome.
The key is to make sure your account line items have clear titles that are easy to keep track of and remember. Simple straightforward account titles such as “Credit Card Fees” or “Construction Materials” are a great way to start.
If you want an more detailed system, subaccounts can be created to track certain items such as specific fees for construction supply expenses like fencing, concrete blocks or pavers. These subaccounts will still allow you to keep your online bookkeeping Chart of Accounts simple and error free while still tracking all transactions at the simplest level.
- Tip: Keep the total number of accounts to a minimum. Too many accounts often leads to more errors with tracking your company’s finances accurately.
PLANNING THE CHART OF ACCOUNTS
You will be relieved to know that QuickBooks Online has done most of the work for you in terms of planning out your Chart of Accounts. You don’t have to build your Chart of Accounts from scratch.
Let’s go over how to effortlessly create your Chart of Accounts in QuickBooks.
When you first establish a new QuickBooks online company file, you are prompted to select an industry. This allows the program to automatically set up a sample Chart of Accounts. These accounts will be standard for your industry. For example, if you choose a service-related industry, you will see an income account for service and labor. This Chart of Accounts should include every account you might need for your service-related business.
Before you decide to set up another account, ask yourself whether you can track this item another way. For example, a service industry might have a lot of different projects for the same customer. Instead of creating another account you may want to construct subaccounts or a separate job for each project.
ACCOUNT DESIGN
As stated earlier, account names are needed. However, don’t worry too much about using numbers to label your accounts. For example, for a small business owner who wants to do your own bookkeeping online, an account name such as “Bank of America” would be more beneficial than numbering the account with “1200.”
- Tip: QuickBooks account numbers are automatically turned off when you create a new company. However, you can turn them on if you decide you want to use account numbering and names. Account numbers can be up to seven digits long.
At this point, it’s time to outline a list of accounts you think your business will need. Be sure to include an account for each category: assets, liabilities, income and expenses. Think about the common transactions that you need to track on a regular basis. For example, if you use a lot of postage to mail products to customers, you might consider multiple expense accounts. Good names would be: UPS expense, FedEx expense and USPS postage expense.
Compare these accounts to the pre-populated list of accounts designed by QuickBooks Online. Add or delete accounts you feel don’t meet your business transaction needs. Again, more isn’t always better when establishing a Chart of Accounts.
- Tip: Without a good naming system, your chart of accounts might end up with similar names for the same account. Fortunately, QuickBooks prevents you from repeating the name of an account. Also, try to use the account type at the end such as “shipping expense” or “postage expense.”
CREATING ACCOUNTS
The Chart of Accounts window is like many other list windows in QuickBooks. You can access the Chart of Accounts window in one of three ways:
- Press Ctrl+A (which can be done from any page in the program)
- In the menu bar, choose Lists →Chart of Accounts
- At the top right of the Home Page, in the Company panel, click Chart of Accounts
Once the Chart of Accounts has been opened you can create new accounts.
- Press Ctrl+N to open the Add New Account window.
On the menu bar at the bottom of the Chart of Accounts window, click Account →New. Or right click anywhere in the Chart of Accounts window, then choose New from the shortcut menu. Either method will prompt QuickBooks to open the Add New Account window.
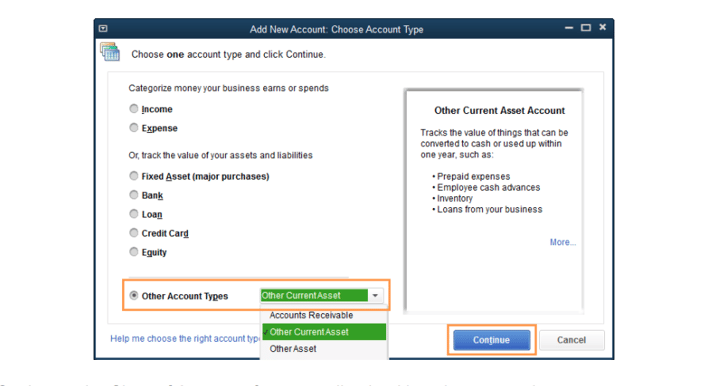
- Select the type of Account you want to create, such as Bank for a bank account, and then click Continue.
The Add New account window lists the most common kinds of accounts. If you don’t see the account type you want, then select the Other Account Types option and then choose from the drop-down menu shown below.
Setting up the Chart of Accounts for your online bookkeeping system is pretty straightforward. However, there are modifications that can be made when working with accounts. From time to time you might need to modify your accounts to change the name, add subaccounts or delete an unused account. You can hide accounts to maintain a tidy list of accounts or delete an account made in error. There’s also a feature that merges accounts if you made too many similar accounts that can be converted into one.
For now, make sure your accounts are set up to meet your business needs. At this stage, the focus should be on creating a system that you will understand. This is the key to success.
We hope this tutorial answered your questions on how to create a Chart of Accounts to organize your business finances. Outsourcing your bookkeeping needs is also another great way to help you save time and money so you can focus on your core operations. Feel free to contact our team to see how we can help you manage your business needs.


.svg "Rewind Logo-vector-dark (2)")

